Software Design Patterns: Structural Patterns
Mohamed Kassem | January 05, 2021

In the previous article, we had discussed what is design patterns and creational design patterns, Today, we will continue to explain the design patterns and we will discuss the structural design patterns.
Table of Contents
-
Structural Patterns
- Facade Pattern
- Adapter Pattern
- Composite Pattern
- Proxy Pattern
- Decorator Pattern
Structural Patterns
Structural patterns are concerned with the composition or relationships of classes i.e. how the classes are made up or constructed or they help in answering “How to build a software component?”, in other words how the entities can use each other.
- Proxy Pattern
- Decorator Pattern
- Adapter Pattern
- Facade Pattern
- Bridge Pattern
- Composite Pattern
- Flyweight Pattern
Facade Pattern
This pattern provide a single simplified interface for client classes to interact with subsystem, A facade literally means the front of a building or an outward appearance to hide a less pleasant reality. The facade pattern essentially does the same job as the definition of the word facade. Its purpose is to hide the complexity of an interface or a subsystem. Facade pattern does not actually add more functionality. It simply acts as a point of entry into your subsystem
Facade Pattern is a wrapper class that encapsulate a subsystem in order to hide subsystem’s complexity.
Real world example
How do you turn on the computer? “Hit the power button” you say! That is what you believe because you are using a simple interface that computer provides on the outside, internally it has to do a lot of stuff to make it happen. This simple interface to the complex subsystem is a facade.
Problem example
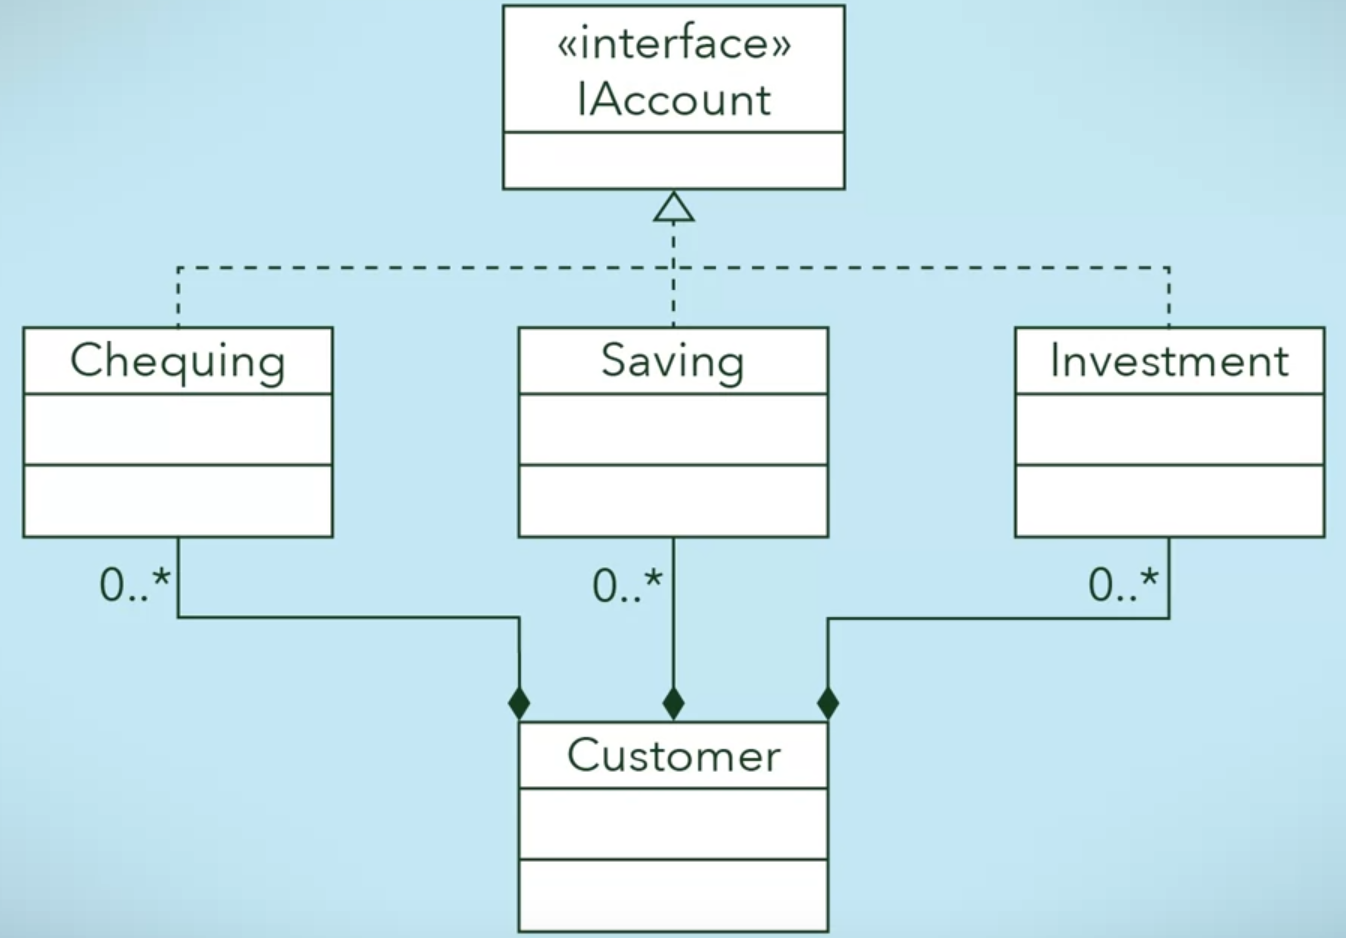
The following diagram shows the classes for simple banking system without facade, Customer class would contains instances of Chequing, Saving and Investment classes, This means Customer must instantiating each of these classes and know all their different attributes and methods
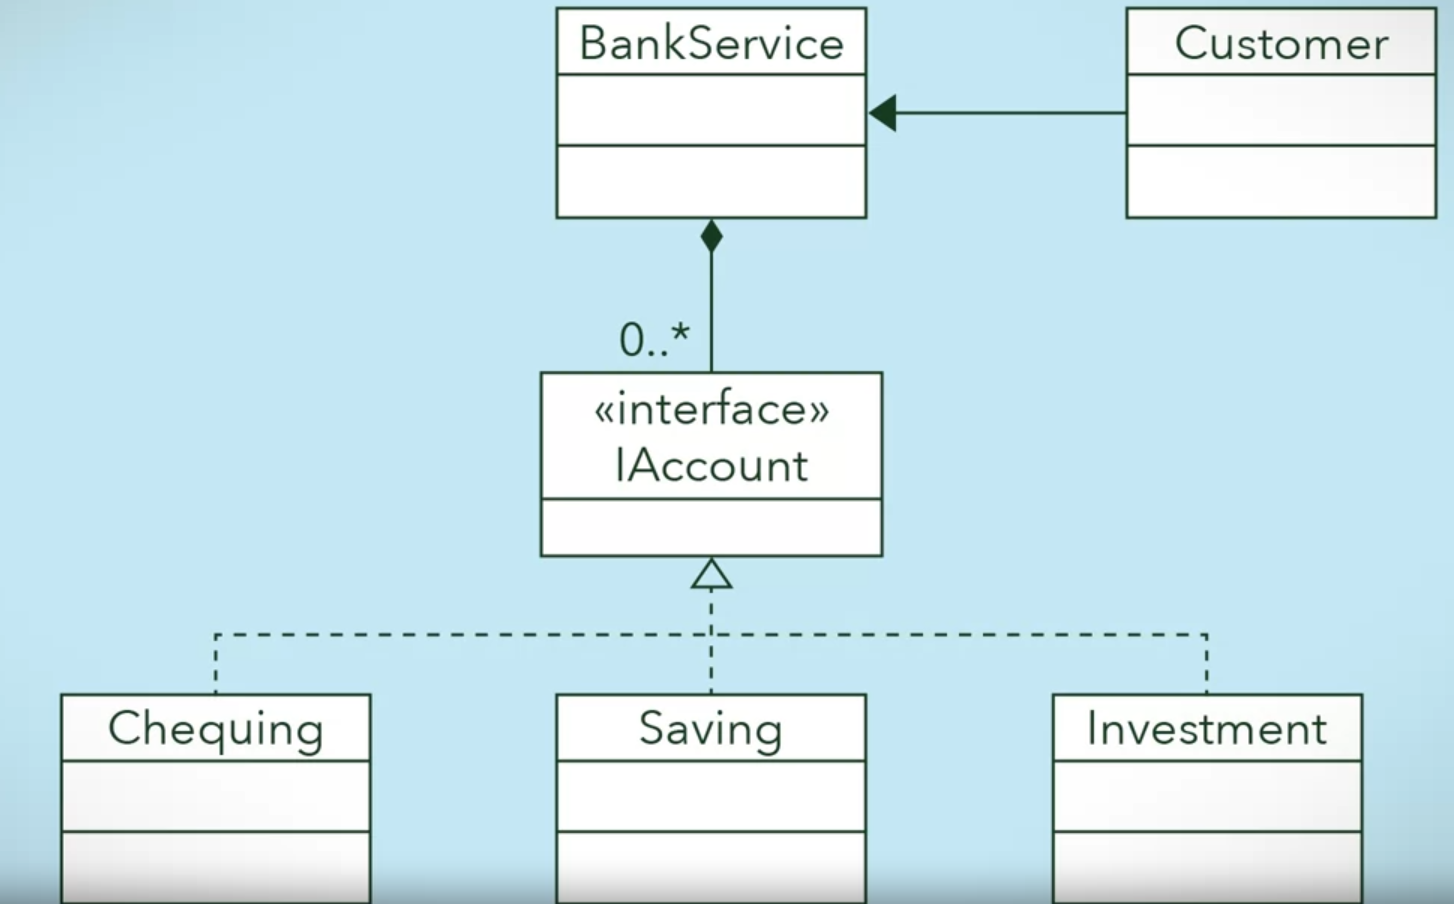
To Solve this problem we introduce the BankService Class to act as a facade class for chequing, saving and investment classes to deal with any other complexities of financial management instead the customer himself, A facade class can be used to wrap all the interfaces and classes for a subsystem not only on interface
Steps to apply Facade Design Pattern
- Step1: Design the interface
public interface IAccount
{
    public void deposit(decimal amount);
    public void withdraw(decimal amount);
		public void transfer(IAccount toAccount, decimal amount);
    public int getAccountNumber();
}- Step2: Implement the interface with one or more classes
public class Chequing : IAccount {.....}
public class Saving : IAccount {.....}
public class Investment : IAccount {.....}- Step3: Create the facade class and wrap the classes that implement the interface
public class BankService
{
    private Dictionary<int, IAccount> BankAccounts;

    public BankService()
    {
        this.BankAccounts = new Dictionary<int, IAccount>();
    }

    public int createNewAccount(string type, decimal initAmount)
    {
        IAccount newAccount = null;
        switch (type)
        {
            case "chequing":
                newAccount = new Chequing(initAmount);
                break;
            case "saving":
                newAccount = new Saving(initAmount);
                break;
            case "investment":
                newAccount = new Investment(initAmount);
                break;
            default:
                Console.WriteLine("Invalid account type");
                break;
        }

        if (newAccount != null)
        {
            this.BankAccounts.Add(newAccount.getAccountNumber(), newAccount);
            return newAccount.getAccountNumber();
        }
        else
        {
            return -1;
        }
    }

    public void transferMoney(int to, int from, decimal amount)
    {
        IAccount toAccount = this.BankAccounts[to];
        IAccount fromAccount = this.BankAccounts[from];
        fromAccount.transfer(toAccount, amount);
    }
}- Step4: Use the facade class to access the subsystem/client class
public class Customer
{
    public static void Main(string[] args)
    {
        BankService bankService = new BankService();

        int mySaving = bankService.createNewAccount("saving", new decimal(500.00));
        int myInvestment = bankService.createNewAccount("investment", new decimal(1000.00));

        bankService.transferMoney(mySaving, myInvestment, new decimal(300.00));
    }
}
Facade Pattern removes the need for client classes to manage a subsystem on their own, resulting in less coupling between the subsystem and the client classes
Facade Pattern handles instantiation of the appropriate class within the subsystem
Facade Pattern provides client classes with a simplified interface for the subsystem
Adapter Pattern
As the name suggests, an adapter is a device that is used to connect pieces of equipment that cannot be connected directly. Software system also has the same compatibility issue with interfaces, in other words the output of one system may not conform to the expected input of another system, you will find this problem in pre-existing system need to incorporate third-party libraries or connect to other systems.
Real World example
Consider that you have some pictures in your memory card and you need to transfer them to your computer. In order to transfer them you need some kind of adapter that is compatible with your computer ports so that you can attach memory card to your computer. In this case card reader is an adapter. Another example would be the famous power adapter; a three legged plug can’t be connected to a two pronged outlet, it needs to use a power adapter that makes it compatible with the two pronged outlet. Yet another example would be a translator translating words spoken by one person to another
The Adapter design pattern facilitates communication between two existing systems by providing a compatible interface. Another definition is allowing incompatible classes to work together by converting the interface of one class into another expected by the clients. Examples like SMS Clients, Database Adapter
Class Diagram and The Parts of Adapter Pattern
- Client: the class who wants to use a third-party library or external system
- Adaptee: the class in the third-party library or external system to be used
- Adapter: the class sites between client and the adaptee, it implement a target interface to conforms what the client is expecting to see.
- Target Interface: the interface which the client will use.
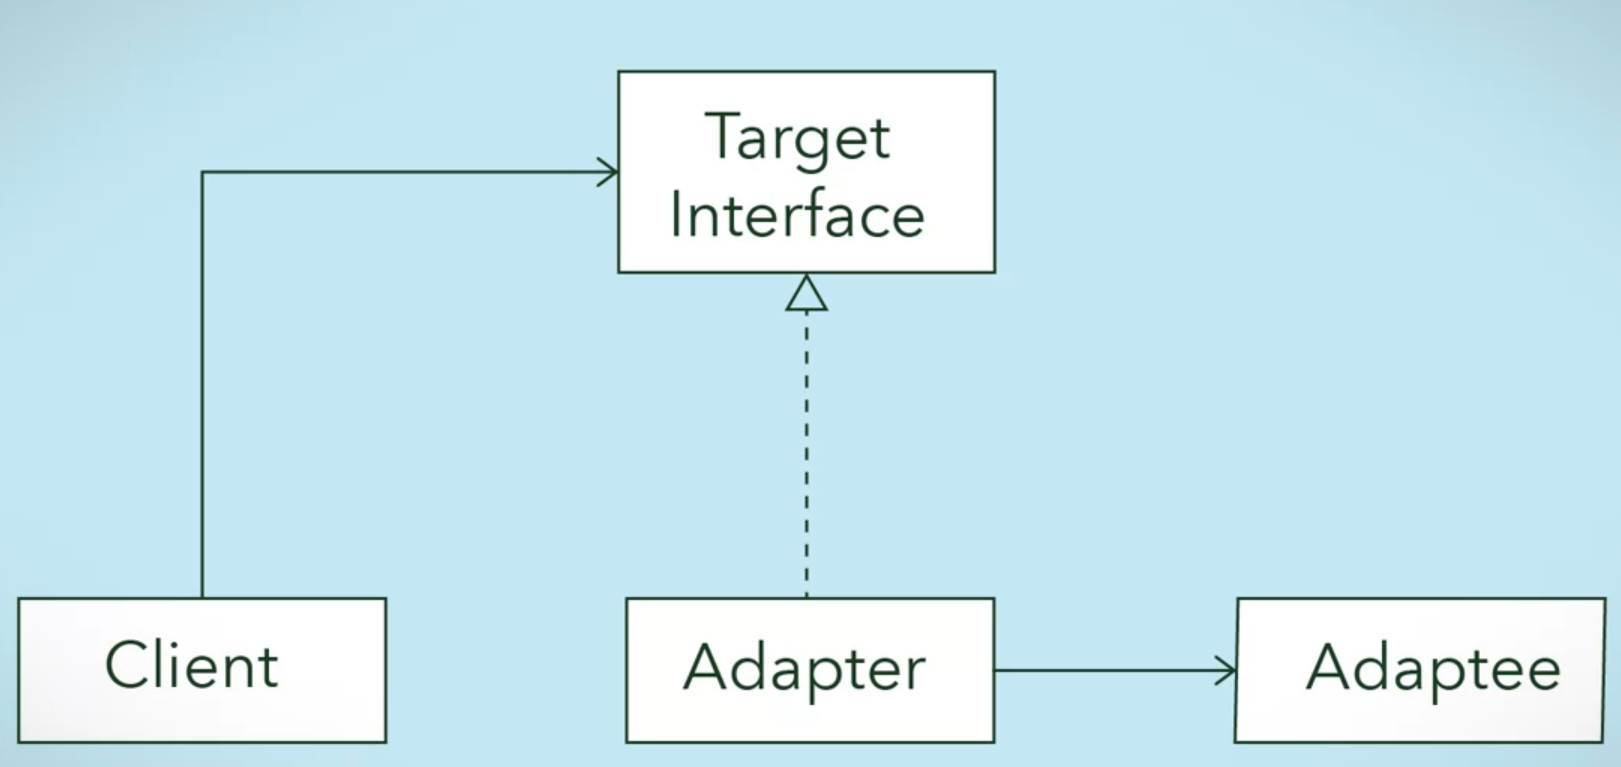
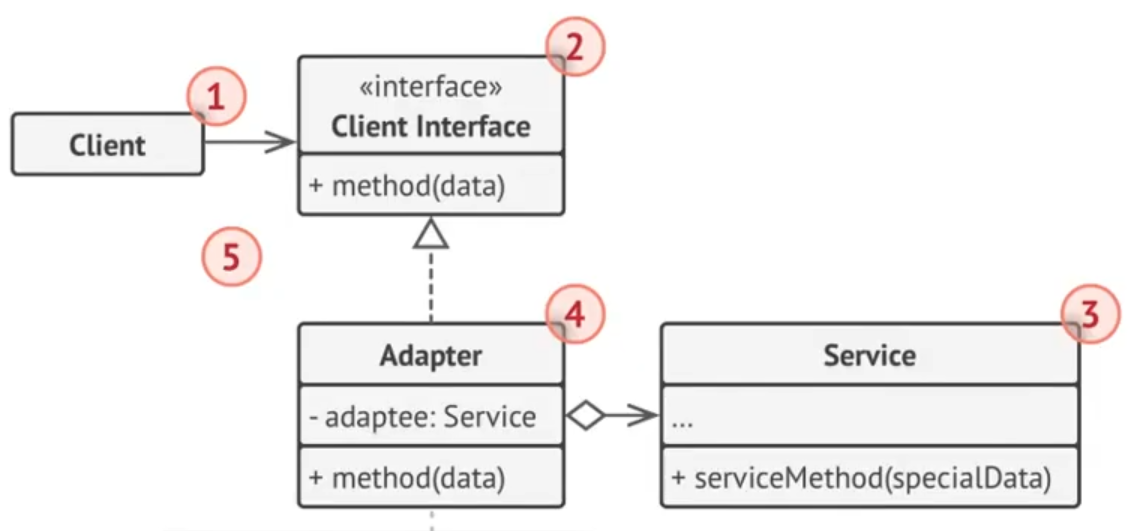
The above diagram shows that the client sends a request to the adapter using the target interface, The adapter will then translate the request into a message that the adaptee will understand.
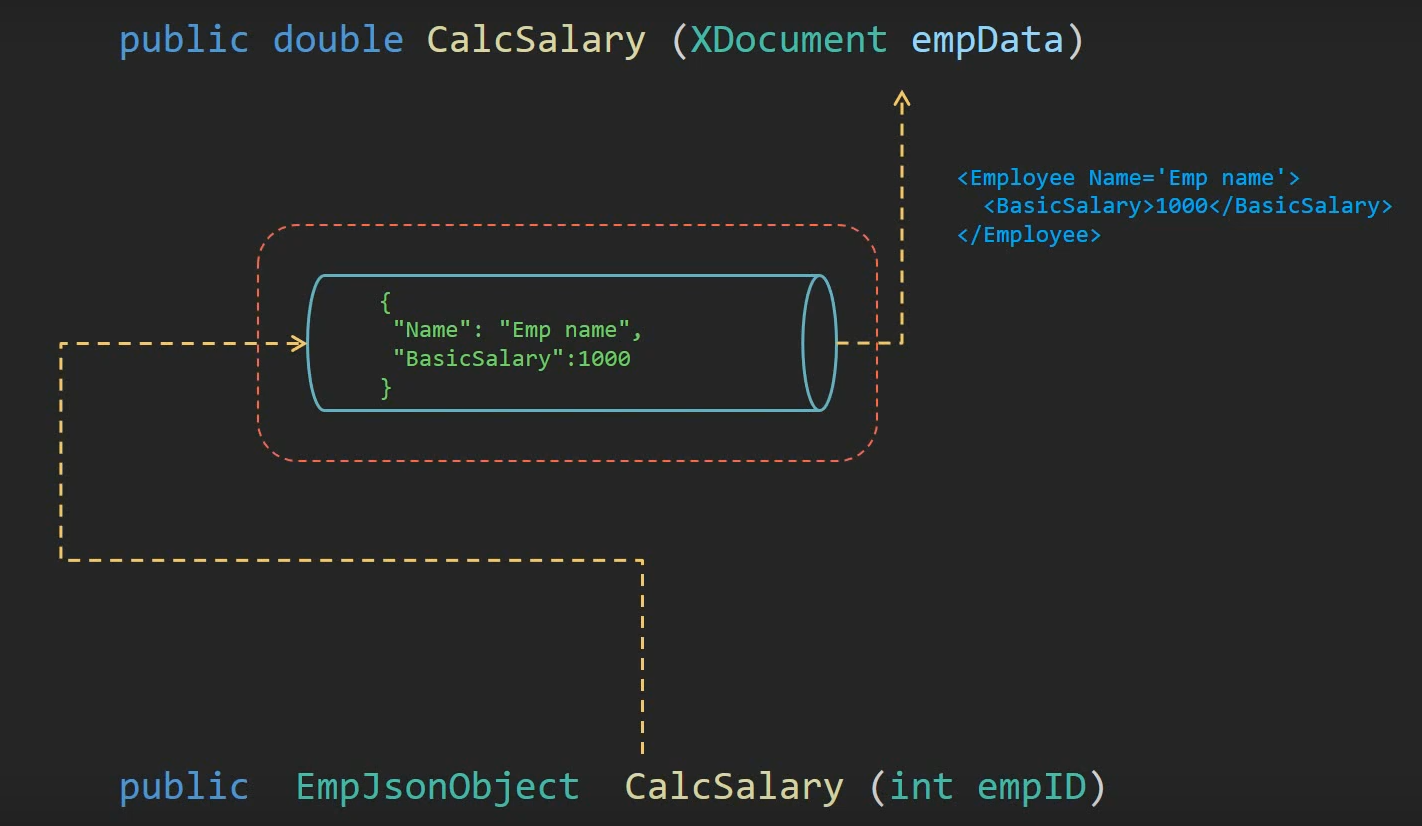
The Steps to implement the adapter pattern with example of talking WebClient to WebService
For example is the WebClient want to send any object but the WebService only accept a JSON object
- Step1: Design the target interface
public interface IWebRequester
{
    public int request(object request);
}- Step2: Implement the target interface with the adapter class
public class WebAdapter : IWebRequester
{
    private WebService service;

    public void connect(WebService currentService)
    {
        this.service = currentService;
    }

    public int request(object request)
    {
        var jsonString = Newtonsoft.Json.JsonConvert.SerializeObject(request);
        var resposne = service.request(jsonString);
        if (resposne != null)
            return 200; // OK status code
        return 500; // raise error status code
    }
}- Step3: Send the request from the client to the adapter using the target interface
public class WebClient
{
    private IWebRequester webRequester;

    public WebClient(IWebRequester webRequester)
    {
        this.webRequester = webRequester;
    }

    public void getInfo()
    {
        object obj = new object();
        int status = webRequester.request(obj);

        if (status == 200)
            Console.WriteLine("OK");
        else
            Console.WriteLine("Not OK");
    }
}- In the main program, the Web Adapter, the Web Service, and the Web Client need to be instantiated, The WebClient deals with the adapter through the WebRequester interface to send a request. The WebClient should not need to know anything about the WebService, such as its need for JSON objects.
class Program
{
    static void Main(string[] args)
    {
        string webHost = "https://google.com";
        WebService service = new WebService(webHost);
        WebAdapter adapter = new WebAdapter();

        adapter.connect(service);

        WebClient client = new WebClient(adapter);
        client.getInfo();
    }
}
Why we just change one interface or the both to be able to talk to each other?
This is not always feasible, especially if the other interface is from a third-party library or external system. Changing your system to match the other system is not always a solution either, because an update by the vendors to the outside systems may break part of our system, Also we don’t change our system interface because if there are subsystem using it.
Composite Pattern
Composite Pattern is meant to compose objects into tree structures to represent part-whole hierarchies, it lets clients treat individual objects and compositions of objects uniformly. For example Composable DTOs.
A composite design pattern is meant to achieve two goals:
- To compose nested structures of objects
- To deal with the classes for these objects uniformly
Class Diagram
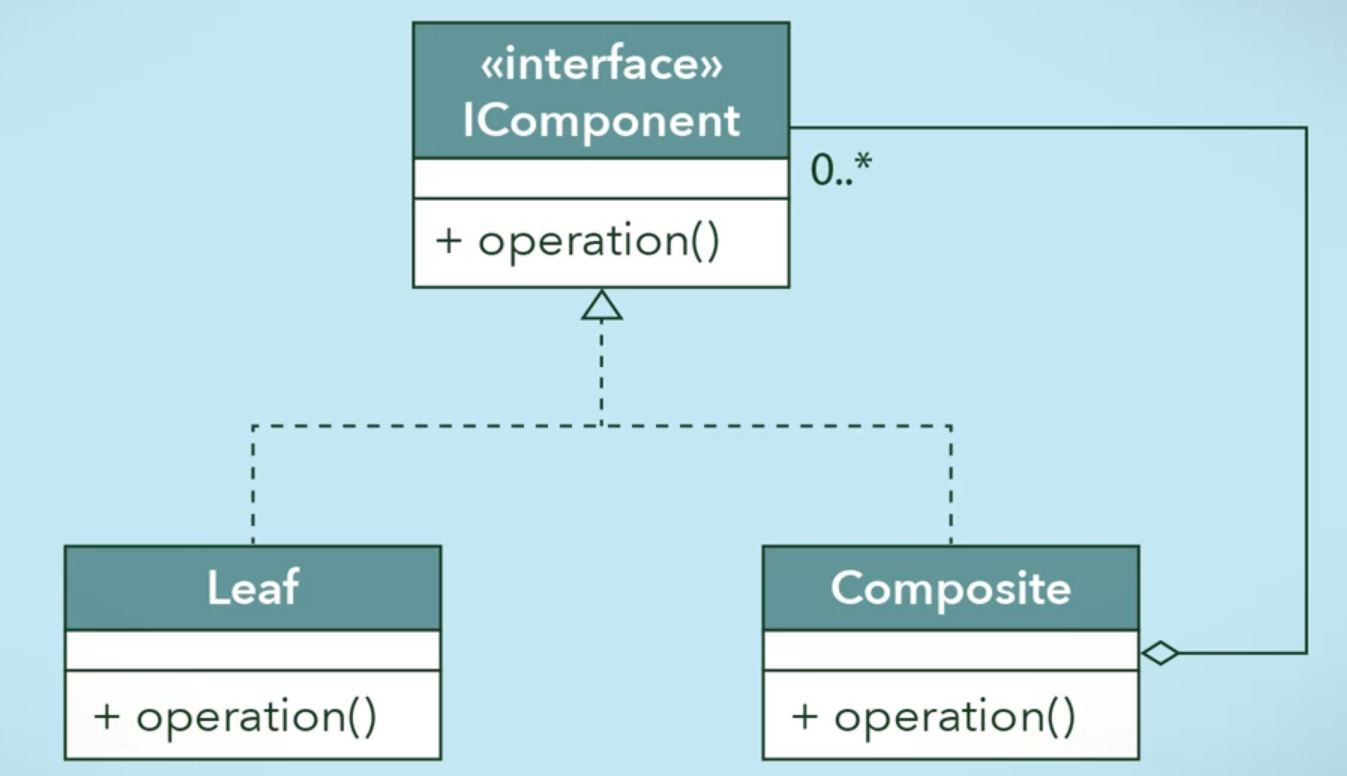
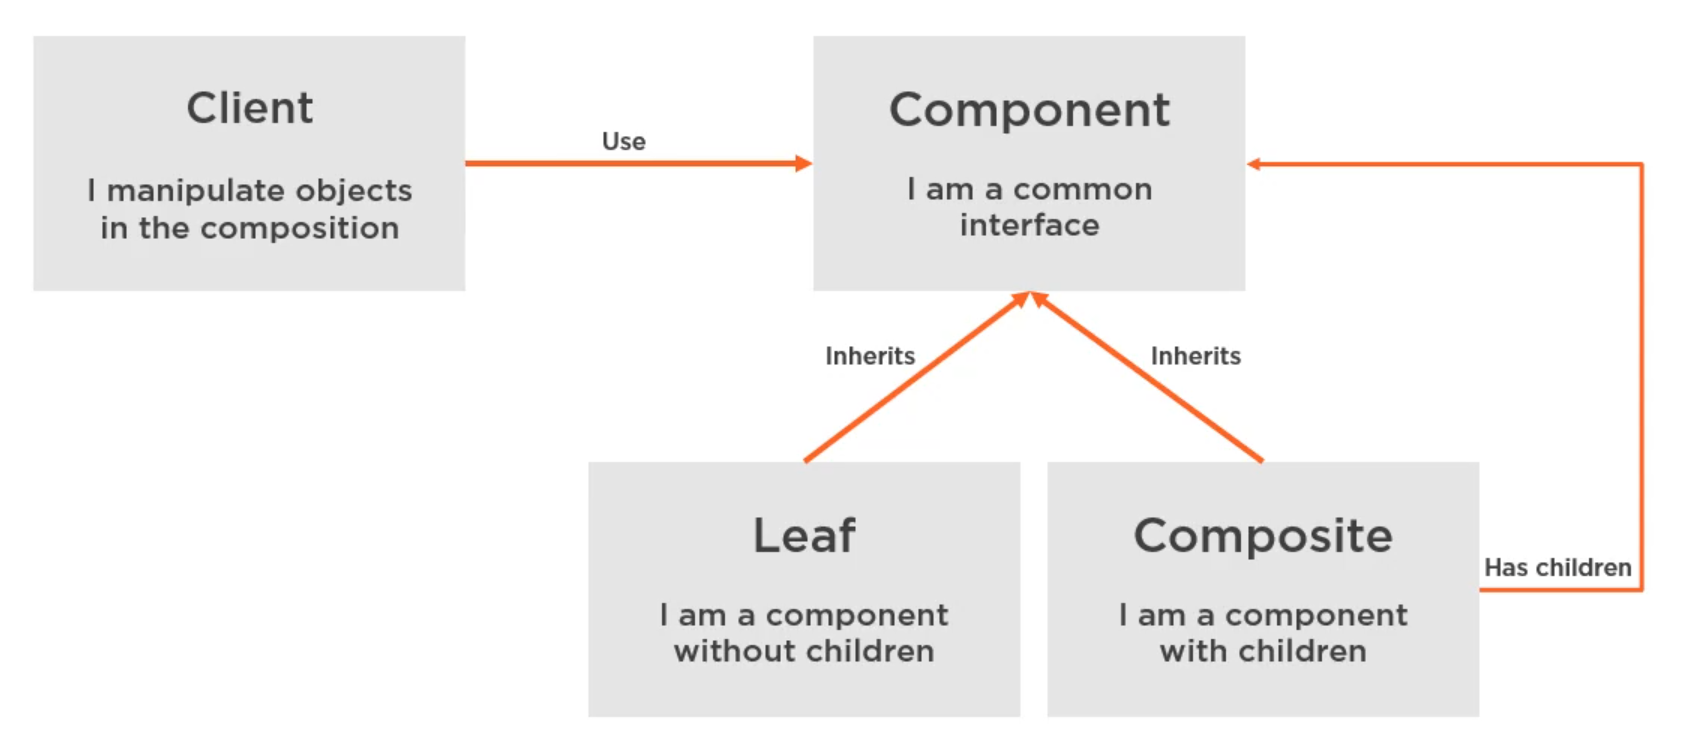
In this design, a component interface serves as the supertype for a set of classes. Using polymorphism, all implementing classes conform to the same interface, allowing them to be dealt with uniformly.
The Composite class is used to aggregate any class that implements the component interface.
A leaf class represents a non-composite type. It is not composed of other components.
You may have other composite or leaf classes in practice not just two, but there will only be one overall component interface or abstract superclass. A composite object can contain another composite object, since the composite class is a subtype of the component. This is known as recursive composition
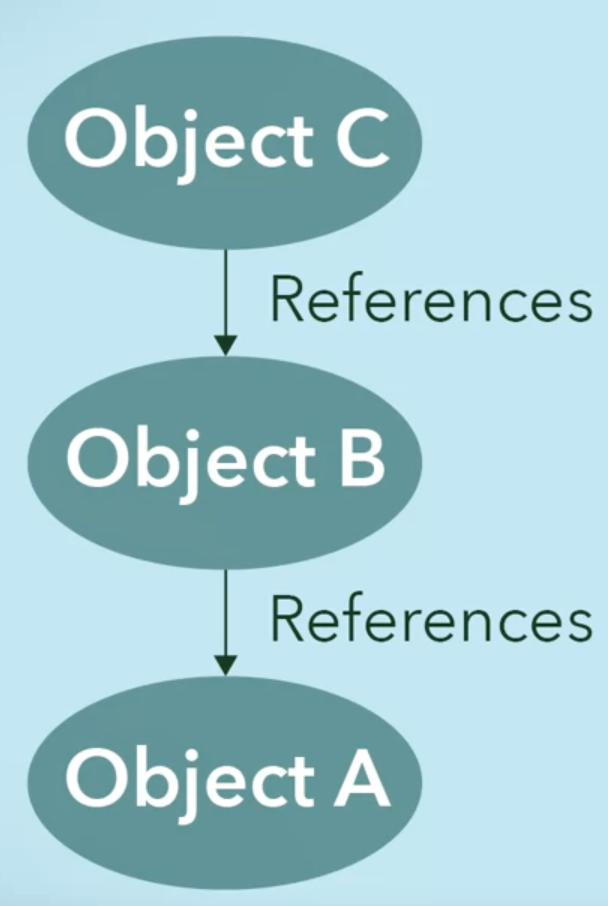
It is easier to think of composite design patterns as trees:
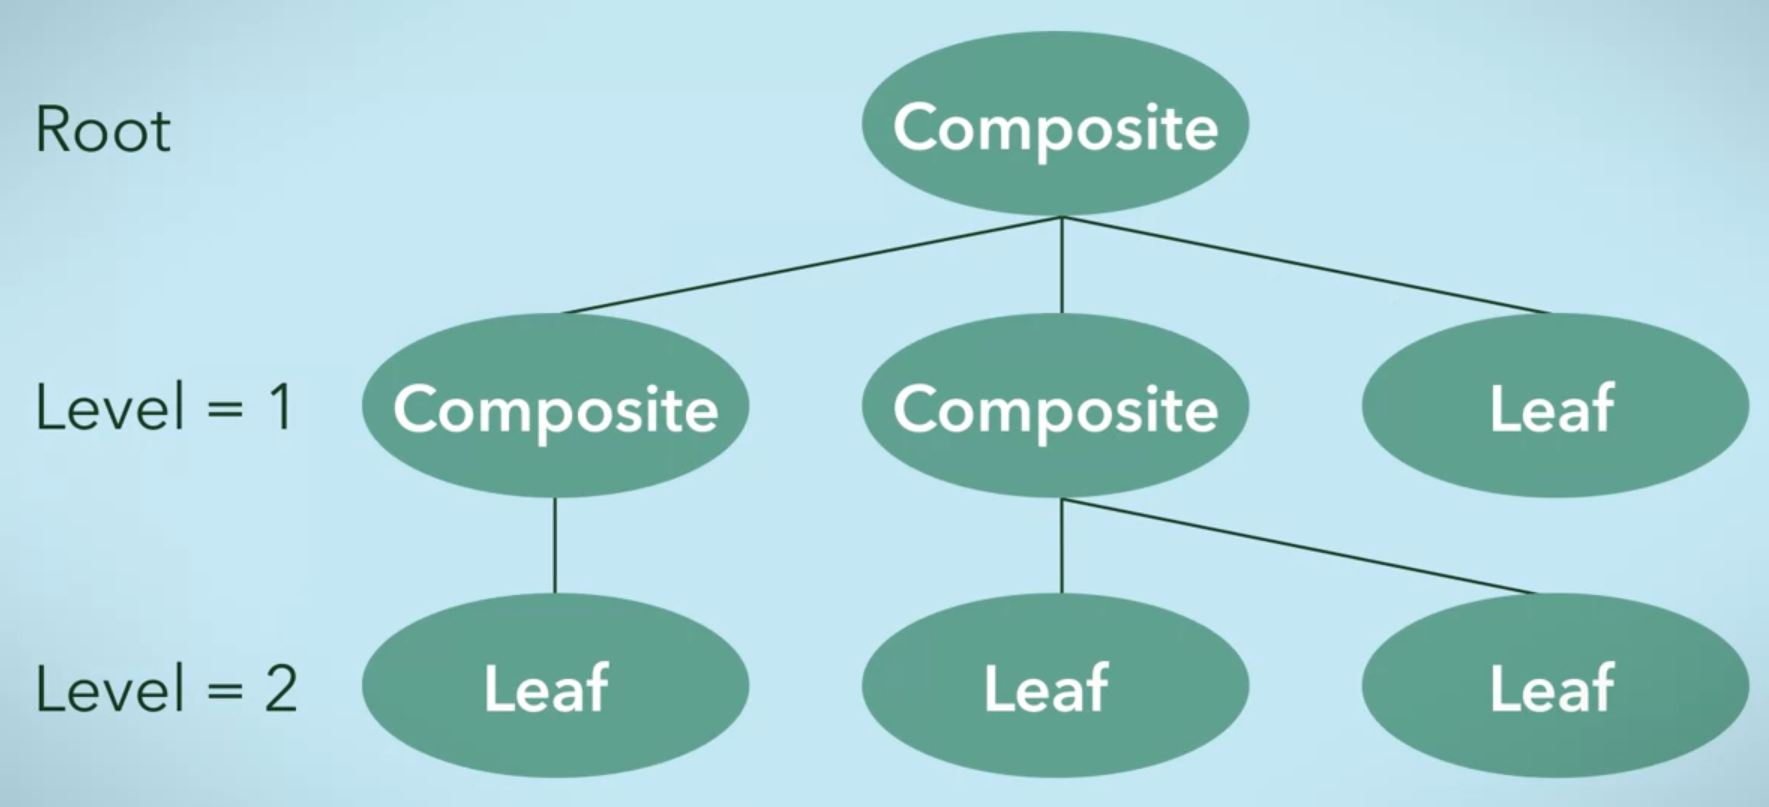
The Composite design pattern is used to address two issues:
- How de we use individual types of objects to build a tree-like structure?
- How can we treat the individual types without checking their types?
Solve this by enforcing polymorphism across each class through implementing an interface (or inheriting from a super class) and use technique recursive composition which allows objects to be composed of other objects that are of a common type.
Real World example
Every organization is composed of employees. Each of the employees has the same features i.e. has a salary, has some responsibilities, may or may not report to someone, may or may not have some subordinates etc. We will use example of how buildings are composed of generic housing structures
Class Diagram of the example
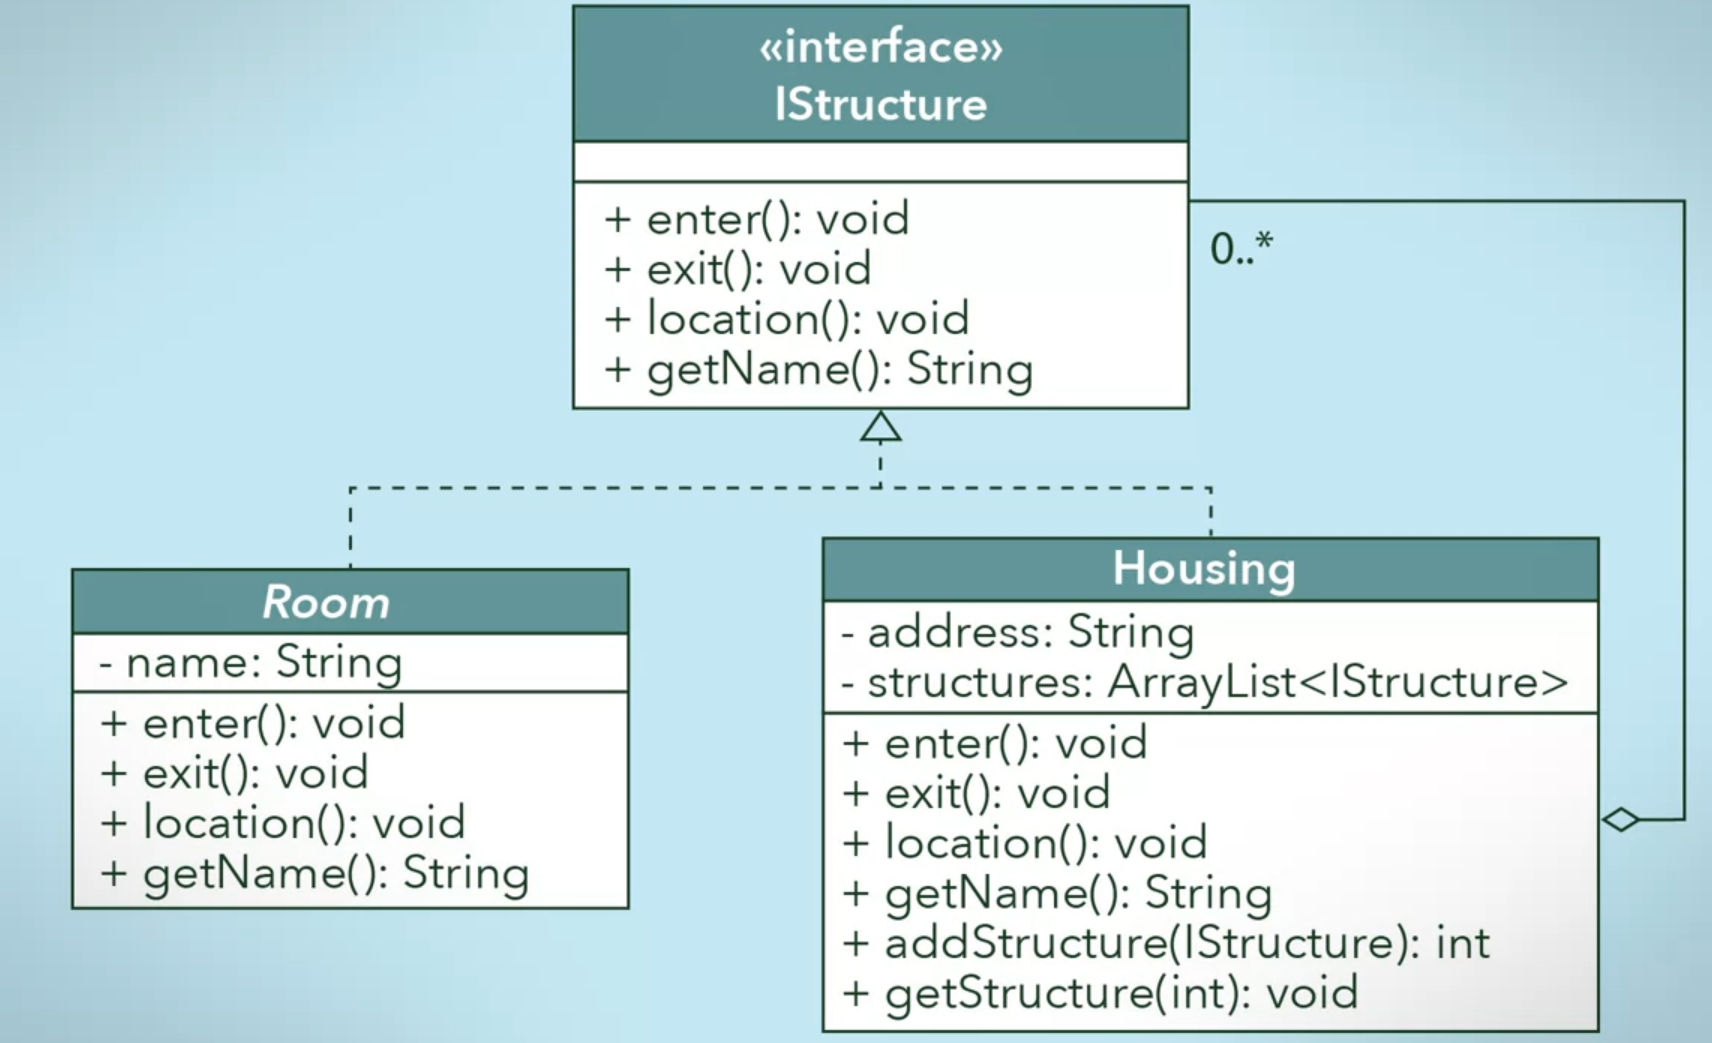
IStructure: is the component interface to describe building like a house, a floor or a room
Housing: is the composite class and it’s type of IStructure and can contains other structures like floors or other housing objects.
Room: is the leaf class and it’s a type of IStructure but cannot contains another room so its leaf.
The Steps to implement the composite pattern
- Step1: Design the interface the defines the overall type
public interface IStructure
{
    public void enter();
    public void exit();
    public void location();
    public string getName();
}- Step 2: Implement the composite class
public class Housing : IStructure
{
    private List<IStructure> _structures;
    private string Address;

    public Housing(string address)
    {
        this._structures = new List<IStructure>();
        this.Address = address;
    }

    public string getName()
    {
        return this.Address;
    }

    public int addStructure(IStructure component)
    {
        _structures.Add(component);
        return this._structures.Count - 1;
    }
    public IStructure getStructure(int componentNumber)
    {
        return this._structures[componentNumber];
    }

    public void enter()
    {
        Console.WriteLine("You have entered the build: " + this.getName());
    }

    public void exit()
    {
        Console.WriteLine("You have exit the build: " + this.getName());
    }

    public void location()
    {
        Console.WriteLine("you are currently in " + this.getName() + ". It has");
        foreach (var str in this._structures)
        {
            Console.WriteLine(str.getName());
        }
    }
}- Step 3: Implement the leaf class
public class Room : IStructure
{
    public string name;

    public void enter()
    {
        Console.WriteLine("you have entered the " + this.name);
    }

    public void exit()
    {
        Console.WriteLine("you have left the " + this.name);
    }

    public string getName()
    {
        return name;
    }

    public void location()
    {
        Console.WriteLine("you have currently in the " + this.name);
    }
}- In main program/client
class Program
{
    static void Main(string[] args)
    {
        Housing building = new Housing("123 street");
        Housing floor1 = new Housing("123 street- First Floor");
        int firstFloor = building.addStructure(floor1);

        Room washroom1m = new Room("1F Mean's Washroom");
        Room washroom1w = new Room("1F Women's Washroom");
        Room common1 = new Room("1F Common Area");

        int firstMeans = floor1.addStructure(washroom1m);
        int firstWomens = floor1.addStructure(washroom1w);
        int firstcommon = floor1.addStructure(common1);

        building.enter(); // enter the building
        Housing currentFloor = (Housing)building.getStructure(firstFloor);
        currentFloor.enter(); // walk into the first floor

        Room currentRoom = (Room)currentFloor.getStructure(firstMeans);
        currentRoom.enter(); // walk into the men's room;
        currentRoom = (Room)currentFloor.getStructure(firstWomens);
        currentRoom.enter(); // walk into the women's room
        currentRoom = (Room)currentFloor.getStructure(firstcommon);
        currentRoom.enter(); // walk into the common area
    }
}
Proxy Pattern
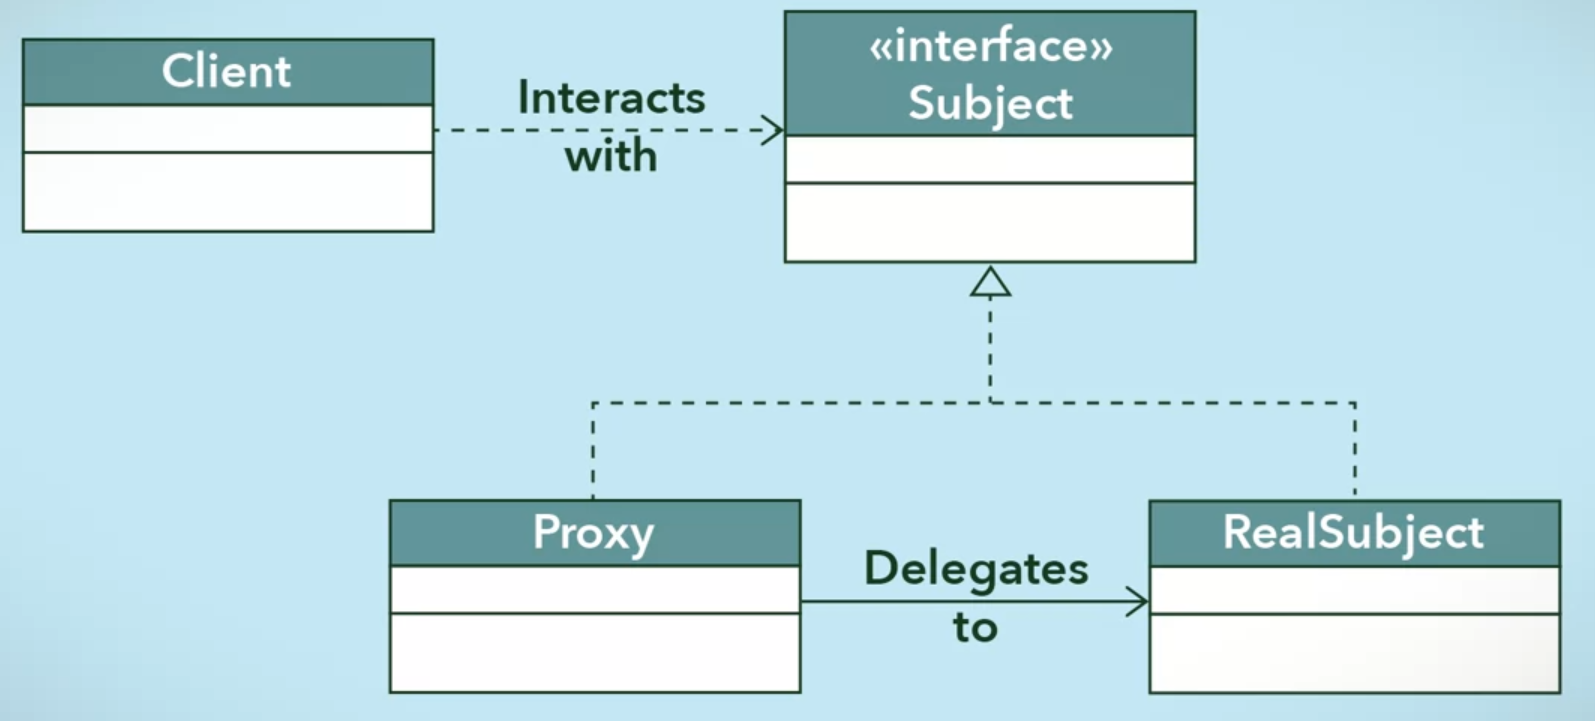
The proxy acts as lightweight version of the original object, and still able to accomplish the same tasks but may send requests to original object to achieve them. In a proxy pattern setup, a proxy is responsible for representing another object called the subject.
Proxy Pattern provides a surrogate or placeholder for another object to control access to it. Like a gateway for an object
Proxy Design Pattern allows a proxy class to represent and wraps a real “subject” class which are a part of your system to hide its reference like sensitive info or resource intensive to instantiate.
So the client will interact with the proxy class instead of real “subject” class, So why we use a proxy class and its types?
- To act as a virtual proxy where the proxy class is used in place of a real class like using on Images and web pages or graphics editors, because single high image can be extremely large. or you have a heavyweight service that wastes system resources by being always up, even you don’t need it at this time
- To act as a protection proxy in order to control access to real subject class like using on learning management system that checks the credentials of a user or checking the count of Free SMS subscription
- To act as a remote proxy where the proxy class is local and the real subject class exists remotely like using on Google API Document on your machine and in google server as third-party API
Class Diagram

Example
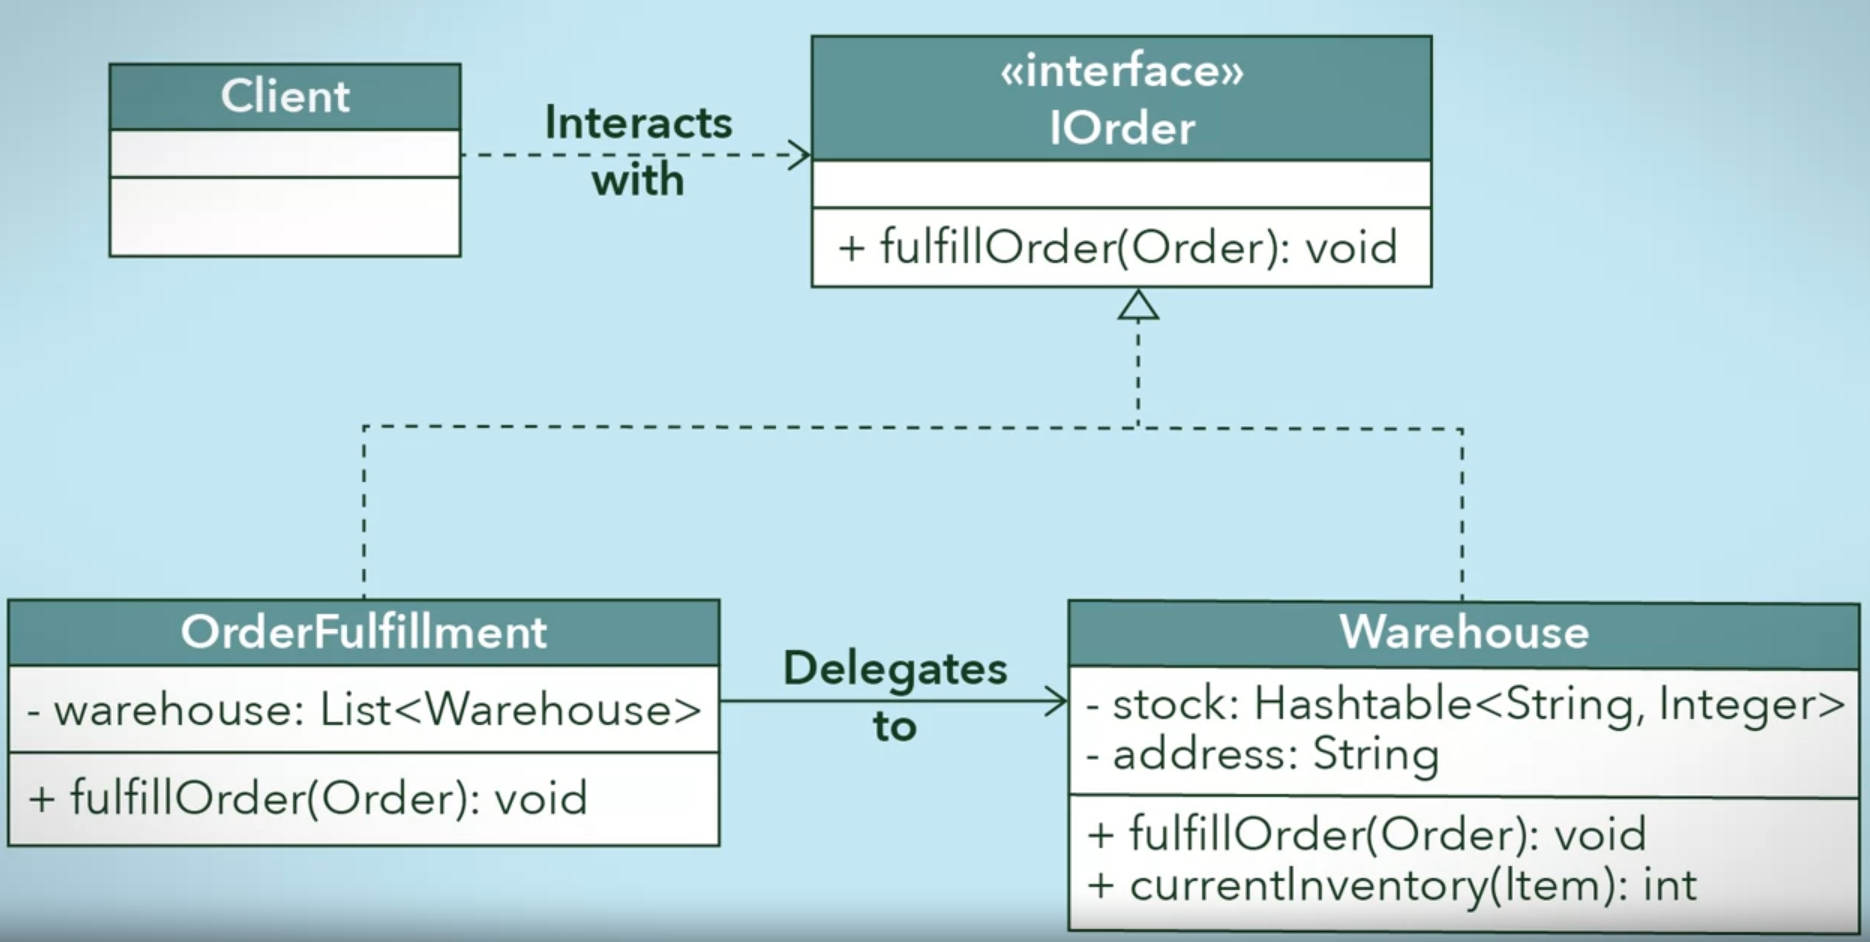
Below is an example of a UML diagram for an online retail store with global distribution and warehousing. In this scenario, you need to determine which warehouse to send orders to. A system will prevent your warehouses from receiving orders that they cannot fulfill. A proxy may protect your real subject, the warehouses, from receiving orders if the warehouses do not have enough stock to fulfill an order.
Steps to Implement Proxy Pattern
- Step 1: Design the subject interface
public interface IOrder
{
    public void FulFillOrder(Order order);
}- Step 2: Implement the real subject class
public class Warehouse : IOrder
{
    private Dictionary<int, Item> Stock = new Dictionary<int, Item>();
    private string Address;

    public void FulFillOrder(Order order)
    {
        foreach (var item in order.ItemList)
        {
            this.Stock.Remove(item.Id);
        }

        // process the order for shipment and dlivery
    }

    public int CurrentInventory(Item item)
    {
        if (Stock.ContainsKey(item.Id))
        {
            return Stock[item.Id].Id;
        }
        return 0;
    }
}- Step 3: Implement the proxy class
the OrderFulfillment class checks warehouse inventory and ensures that an order can be completed before sending requests to the warehouse. To do this, it asks each warehouse if it has enough stock of a particular item. If a warehouse does, then the item gets added to a new Order object that will be sent to the Warehouse. The OrderFulfillment class also lets you separate order validation from the order fulfillment by separate them into two pieces. This improves the overall rate of processing an order, as the warehouse does not have to worry about the validation process or about re-routing an order if it cannot be fulfilled.
The OrderFulfillment class can be improved with other functionalities, such as prioritizing sending orders to warehouses based on proximity to the customer.
public class OrderFulFillment : IOrder
{
    private List<Warehouse> Warehouses = new List<Warehouse>();

    public void FulFillOrder(Order order)
    {
        // for each item in a customer order, check each warehouse to see if it is in stock
        // if it is then create a new order for that warehouse
        // else check the next warehouse

        // Send the all the Orders to the warehouse(s)
        // after you finish iterating over all the items in
        // the original Order.

        foreach (var item in order.ItemList)
        {
            foreach (var warehouse in Warehouses)
            {
                // .....
								// if item in stock
								// warehouse.FulFillOrder(order);
            }
        }
    }
}
Decorator Pattern
The decorator pattern adds new functionality to objects without modifying their defining classes. Like Open–closed principle.
Decorator Pattern allows additional behaviors or responsibilities to be dynamically attached to an object, through the use of aggregation to combine behaviors at runtime.
Decorator provide a flexible alternative to sub classing for extending functionality. Also Know as: Wrapper
Like a Black Coffee, Milk Coffee, Whip Coffee, and Vanilla Coffee
- Black Coffee = the base
- Milk Coffee = Black Coffee + Milk
- Whip Coffee = Black Coffee + Milk + Whip
- Vanilla Coffee = Black Coffee + Milk + Whip + Vanilla
Real World Example
Imagine you run a car service shop offering multiple services. Now how do you calculate the bill to be charged? You pick one service and dynamically keep adding to it the prices for the provided services till you get the final cost. Here each type of service is a decorator.
Class Diagram
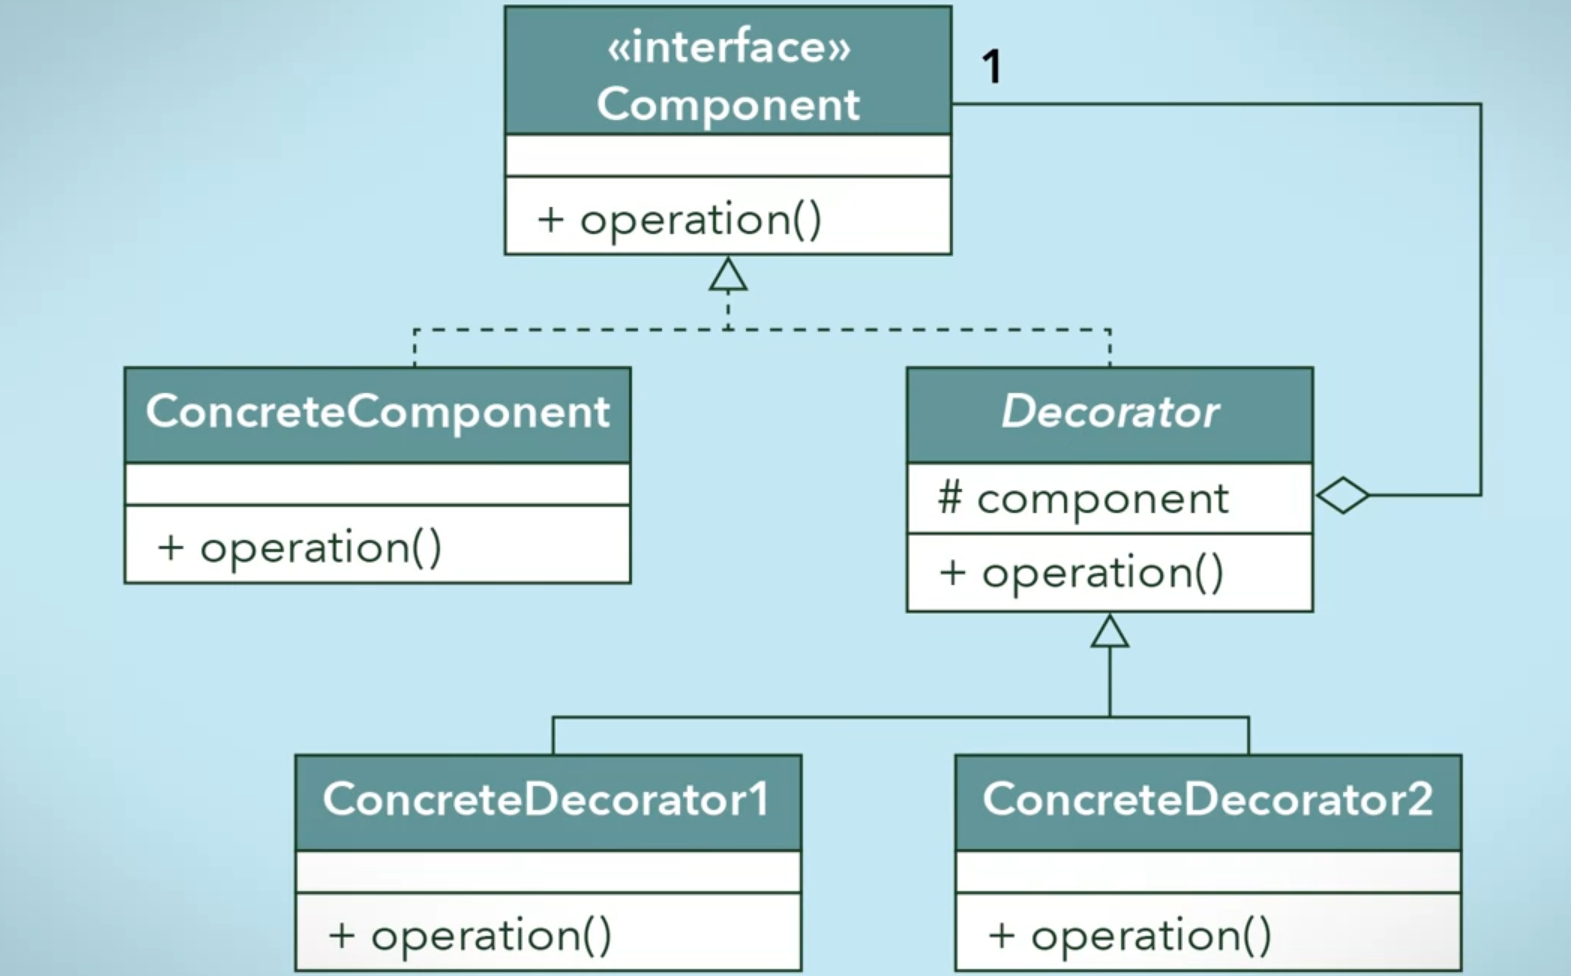
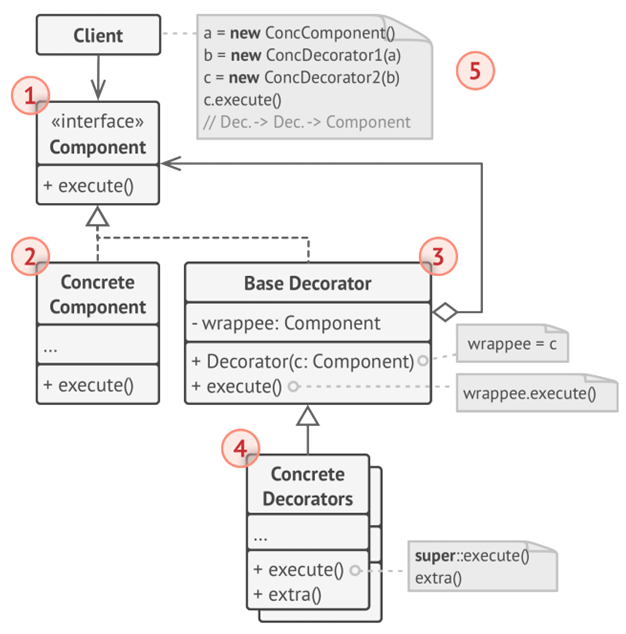
Decorator is an abstract class that implements the component interface to aggregates other types of component which allow users to “stack” components on top of each other.
Decorator serves as the abstract superclass of concrete decorator classes that will each provide an increment of behavior.
We build the stack of components starting with an instance of ConcreteComponent class and continuing with subclasses of the decorator abstract class.
Example
You have a SMS service that provide sending SMS messages, you need to add more functionality when the SMS message has been sent, you will notify the customer at his email.
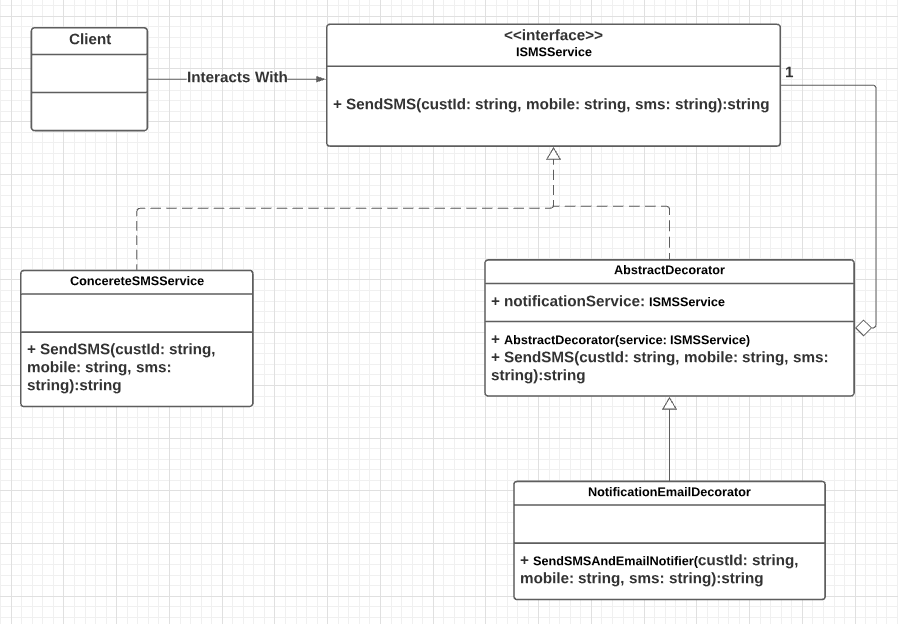
you can define any number of additional behaviors you want to ConcereteSMSService like NotificationEmailDecorator, that’s better, unlike if you use inheritance of ConcereteSMSService, you will need to create a class for every combination of these behaviors
Steps to implement Decorator Pattern
- Step 1: Design the component interface
public interface ISMSService
{
    public string SendSMS(string custId, string mobile, string sms);
}- Step 2: Implement the interface with your base concrete component class
public class ConcereteSMSService : ISMSService
{
    public string SendSMS(string custId, string mobile, string sms)
    {
        return $"CustomerId {custId},the message {sms}, had sent to {mobile} successfully";
    }
}- Step 3: Implement the interface with your abstract decorator class
public abstract class AbstractDecorator: ISMSService
{
    protected ISMSService notificationService;

    public AbstractDecorator(ISMSService service)
    {
        notificationService = service;
    }

    public string SendSMS(string custId, string mobile, string sms)
    {
        if (notificationService != null)
        {
            return notificationService.SendSMS(custId, mobile, sms);
        }
        else
        {
            return "Notification service not initialized!";
        }
    }
}- Step 4: inherit from the abstract decorator and implement the component interface with concrete decorator classes
public class NotificationEmailDecorator : AbstractDecorator
{
    public NotificationEmailDecorator(ISMSService service) : base(service)
    {
    }

    public string SendSMSAndEmailNotifier(string custId, string mobile, string sms)
    {
				// get the base and add on it
        StringBuilder result = new StringBuilder();
        result.AppendLine(base.SendSMS(custId, mobile, sms));

        // decorator method to send mail (additional functionality)
        // sending email logic here
        result.AppendLine($"this mail about sending SMS {sms}, send to {custId}, at {DateTime.Now.ToLongDateString()}");

        return result.ToString();
    }
}- In Main Program/client
class Program
{
    static void Main(string[] args)
    {
        ISMSService smsService = new ConcereteSMSService();
        // any additional Concrete Decorators
        NotificationEmailDecorator emailDecorator = new NotificationEmailDecorator(smsService);

        Console.WriteLine(emailDecorator.SendSMSAndEmailNotifier("123", "01154321101", "message 1"));

			// Output
			// CustomerId 123,the message message 1, had sent to 01154321101 successfully
			// this mail about sending SMS message 1, send to 123, at Monday, January 25, 2021
    }
}